Installing Docker
Omitted here — just follow the CentOS Docker installation instructions.
curl -sSL https://get.daocloud.io/docker | sh
Uninstall old versions
sudo yum remove docker \
                 docker-client \
                 docker-client-latest \
                 docker-common \
                 docker-latest \
                 docker-latest-logrotate \
                 docker-logrotate \
                 docker-engine
Note: <font style="color:#000000;">iptables</font> must be enabled
service iptables restart
Restart docker
service docker restart
Writing the Dockerfile
Finding the base environment
The first line of the Dockerfile is the base environment of your CTF challenge. For example:
FROM drupalci/php-5.5.38-apache:dev
This means the base environment is the image pulled from hub.docker.com/r/drupalci/php-5.5.38-apache.
So where do you find such a base environment?
Simply search for a suitable version on https://hub.docker.com. Note that you must specify the <font style="color:#000000;">tag</font> — that is, the <font style="color:#000000;">dev</font> after the colon above — which indicates the middleware version inside the image. A common <font style="color:#000000;">tag</font> is <font style="color:#000000;">latest</font>.
Tuning environment parameters
Sometimes, depending on the environment, we need to modify the middleware configuration, such as the Apache configuration file <font style="color:#000000;">apache2.conf</font> or the PHP configuration file <font style="color:#000000;">php.ini</font>. That requires writing the corresponding steps in the Dockerfile.
Below are the commonly used command patterns; for more details see =>How to Build Images with a Dockerfile
Sample Dockerfile
# The first line: the base image, same as in point 1
FROM drupalci/php-5.5.38-apache:dev

# Put your name/nickname here
MAINTAINER unc1e

# Put the build date here
ENV REFRESHED_AT 2020年8月1日

# Use UTF-8 encoding
ENV LANG C.UTF-8

# First: change the package sources / update 【if necessary】
# Replace the sources (use sed here, or directly COPY a full sources.list to replace it)
RUN sed -i 's/http:\/\/archive.ubuntu.com\/ubuntu\//http:\/\/mirrors.163.com\/ubuntu\//g' /etc/apt/sources.list

# Update
RUN apt-get update -y

# Set the environment variable to non-interactive 【optional, personal preference】. Especially useful when running apt-get, because it keeps prompting the user about the current step and requiring confirmation.
# Non-interactive mode picks the default options and finishes the build as fast as possible.
# Note: the ENV command takes effect for the entire lifetime of the container, which may cause problems when you interact with the container via BASH
ENV DEBIAN_FRONTEND noninteractive

# Modify some configuration
# For replacing strings in files, use the sed command a lot
# For example: remove X-Powered-By from the PHP response headers
RUN sed -i 's/expose_php = On/expose_php = Off/' /usr/local/etc/php/php.ini

# Only then copy files
# Mounting volumes is not recommended, because the image often needs to be exported as a tar archive
# ADD automatically extracts archives, while COPY does not
ADD html.tgz /var/www

# Remaining operations (keep permissions under control)
# For example: change the owner of a file
RUN chown root:root /var/www/html/x.php

# WORKDIR: sets the working directory for the command specified by CMD.
WORKDIR /var/www/html/

# Finally handle the flag and startup items
# The standard flag format is flag{uuid format} (e.g. flag{8ba868f2-71b6-477b-bc7a-255302c881e1}
# If there are special circumstances, explain them, but the flag format must at least be flag{}; other formats are not accepted.
# By default the flag value is stored in flag.txt.
# If the flag is in a database, remember to set the length of the field holding the flag to greater than 42
# Copy flag.txt to /root/flag.txt
COPY flag.txt /root/flag.txt

# start.sh is the startup script, containing the commands to run after the container starts
COPY start.sh /root/start.sh

# Add execute permission
RUN chmod +x /root/start.sh

# ENTRYPOINT: configures the command executed when the container starts (it will not be ignored and will definitely run)
# Using ENTRYPOINT instead of CMD is recommended, because CMD is easily affected by the last RUN command
ENTRYPOINT cd /root; ./start.sh

# The exposed WEB port defaults to 80, usually just one; if there are special circumstances, state them explicitly
# One article points out: the EXPOSE instruction declares the ports the container serves at runtime. It is only a declaration — at runtime the application will not open a service on the port just because of this declaration. Source: https://www.jianshu.com/p/78f4591b7ff0
EXPOSE 80

Image from Zhou Xulong’s article: The Dockerfile You Must Know
Why is start.sh needed? A reminder here: the Dockerfile only defines the commands/operations to execute once the software starts, and what it can do is limited
Sample start.sh
#!/bin/bash
# Default to bash on the first line
# Sleep at least 1 second, but not too long
sleep 1

# Start the services, e.g. apache2
# The exact startup command depends on the system environment
# Typical apache2
/etc/init.d/apache2 start
# Typical nginx
# To fit most environments, tweak the nginx config
sed -i 's/listen 80 default_server;/listen 80;/' /etc/nginx/sites-enabled/default
sed -i 's/listen \[::\]:80.*;/#\0/' /etc/nginx/sites-enabled/default
nginx -c /etc/nginx/nginx.conf
/etc/init.d/nginx start
# To accommodate various docker versions, the mysql startup command is recommended as follows (except for mysqld)
find /var/lib/mysql -type f -exec touch {} \; && service mysql start

# ctf.sql is the database SQL file; import it only after mysql has started.
# If the flag is not stored in the database, put the file that holds the flag here instead (e.g. flag.php)
# The flag value in the flag file should be written as flag{xxxxxx} (this is set up for dynamic replacement)
flagfile=/var/www/html/ctf.sql
if [ -f $flagfile ]; then
#   This replaces the flag value with the value from /root/flag.txt (/root/flag.txt is where the dynamic flag gets delivered automatically)
#   flag{x*} here corresponds to flag{xxxxxx}, because sed does not support extended regex syntax
#   If the flag value in the original file is not flag{xxxxxx}, rewrite the line below yourself
    sed -i "s/flag{x*}/$(cat /root/flag.txt)/" $flagfile
#   Change the mysql root password (if mysql is used and it must be changed)
    mysqladmin -u root password "newpasswd"
#   Import the sql file into mysql (newwpasswd is just an example password)
    mysql -uroot -pnewpasswd < $flagfile
#   Delete the sql file (usually it should be deleted) / if it is not an sql file, no need to delete it here
    rm -f $flagfile
fi
/bin/bash
Configuring the startup command
Sometimes, for various special needs — such as implementing a dynamic flag that must be specified from outside the docker container — you need to understand how to write <font style="color:#000000;">docker-compose.yml</font>.
To implement a dynamic flag, <font style="color:#000000;">docker-compose.yml</font> and <font style="color:#000000;">Dockerfile</font> must work together. Here I use the image of bytectf_2019_babyblog made by zhao-shifu (glzjin) as the illustration.
docker-compose.yml
docker-compose.yml is a template file; every service defined in it must specify an image via the image directive, or be built automatically via the build directive (requires a Dockerfile).
Below is a simple example — with just 1 container.
version: "2"# Indicates that this Docker-Compose file uses the Version 2 file format

services:

  web:
    build: .
    image: ctftraining/bytectf_2019_babyblog
    restart: always
    ports:
      - "127.0.0.1:8302:80"
    environment:
      - FLAG=flag{glzjin_wants_a_girl_firend}
Dockerfile
FROM orsolin/docker-php-5.3-apache

LABEL Author="glzjin <i@zhaoj.in>" Blog="https://www.zhaoj.in"

COPY ./files /tmp/files

RUN mv -f /tmp/files/sources.list /etc/apt/sources.list \
    && rm -rf /var/www/html/* \
    && mv -f /tmp/files/init.sql /tmp/db.sql \
    && mv -f /tmp/files/html/* /var/www/html/ \
    && apt update \
    && echo "debconf mysql-server/root_password password root\ndebconf mysql-server/root_password_again password root" >> /tmp/mysql-passwd \
    && debconf-set-selections /tmp/mysql-passwd && apt install mysql-server -y && rm -rf /tmp/mysql-passwd \
    && mysql_install_db --user=mysql --datadir=/var/lib/mysql \
    && sh -c 'mysqld_safe &' \
    && sleep 5s \
    && mysql -e "source /tmp/db.sql;" -uroot -proot \
    && echo "magic_quotes_gpc = Off\nopen_basedir = /var/www/html/:/tmp/:/proc/\ndisable_functions = pcntl_alarm,pcntl_fork,pcntl_waitpid,pcntl_wait,pcntl_wifexited,pcntl_wifstopped,pcntl_wifsignaled,ini_set,pcntl_wifcontinued,pcntl_wexitstatus,pcntl_wtermsig,pcntl_wstopsig,pcntl_signal,pcntl_signal_get_handler,pcntl_signal_dispatch,pcntl_get_last_error,pcntl_strerror,pcntl_sigprocmask,pcntl_sigwaitinfo,pcntl_sigtimedwait,pcntl_exec,pcntl_getpriority,pcntl_setpriority,pcntl_async_signals,system,exec,shell_exec,popen,proc_open,passthru,symlink,link,syslog,imap_open,dl,mail	" >> /etc/php5/apache2/php.ini && \
    touch /flag && \
    mv /tmp/files/readflag /readflag && \
    chmod 555 /readflag && \
    chmod u+s /readflag && \
    chmod 500 /flag

WORKDIR /var/www/html/

CMD echo $FLAG >> /flag && export FLAG=not_flag && FLAG=not_flag && find /var/lib/mysql -type f -exec touch {} \; && service mysql start && apache2-foreground
As for how to implement a dynamic <font style="color:#000000;">flag</font>: you have probably already figured it out — you only need to look at the last line of both files. First, in <font style="color:#000000;">docker-compose.yml</font>, set an environment variable (<font style="color:#000000;">environment</font>) named <font style="color:#000000;">FLAG</font>, which is our dynamic flag value; then the command <font style="color:#000000;">CMD echo $FLAG >> /flag</font> in the <font style="color:#000000;">Dockerfile</font> writes this FLAG into the <font style="color:#000000;">/flag</font> file.
For the operator, to get a dynamic flag working for a given CTF challenge, you only need to adjust <font style="color:#000000;">docker-compose.yml</font> and then run <font style="color:#000000;">docker-compose up -d</font> — no changes to the <font style="color:#000000;">Dockerfile</font> are needed at all. This is very useful in certain scenarios (CTF ranges, AWD).
However, if you still do not understand the relationship between <font style="color:#000000;">docker-compose</font> and <font style="color:#000000;">docker</font>, see =>Docker Microservices Tutorial - Ruan Yifeng’s Blog. I summarize it as follows:
Compose is a tool released by Docker that manages multiple Docker containers as one application. You define a YAML-format configuration file,
<font style="color:#000000;">docker-compose.yml</font>, describing how the containers call each other. Then, with a single command, you can start/stop all of these containers together.
Common docker-compose operations commands are as follows
# docker-compose operations commands

# Start all services defined in the docker-compose.yml in the current directory
$ docker-compose up

# Start all services defined in the docker-compose.yml in the current directory and 【run in the background】
$ docker-compose up -d

# Stop all services
$ docker-compose stop
Testing the Docker image
After finishing the Dockerfile above and packaging the image, run the following command in the current directory to build the image
# Build the image
docker build -t web_ctf_puzzle:test1 .
After a short wait, run the docker images command and you will see the image named web_ctf_puzzle with TAG test1.
A reminder: some organizations, when collecting challenges, require the author to provide a usable docker image archive (tar package). Possible reasons: on one hand, what gets installed may not be exactly identical to what the author had when building it; on the other hand, the external network may be disconnected during installation. Making a docker image archive is not complicated, though — just follow these commands
# Export the tar archive
docker save web_xxx_name  > web_xxx_name.tar
Intercommunication between Docker containers
In many cases, different docker containers need to access each other (intercommunicate), which requires the corresponding configuration. Below are two interconnection schemes I personally use often
Option 1: docker run –links
Add the --links option to a standalone docker run command
docker run --linkcan link 2 containers so that the initiating container and the receiving container can communicate with each other.--linkhas other uses too, but let’s set those aside.
For example, I first start a redis container with the following command:
$ docker run -p 6379:6379 --name="redis" -d docker.io/redis:3-alpine
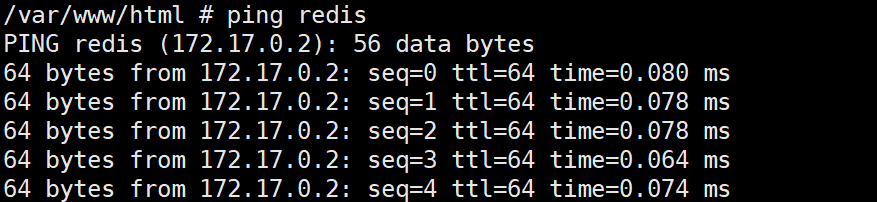
Then, looking at a PHP container on hand, I want it to intercommunicate with redis — I just need to run the following command
$ docker container run -p 80:80  --name="web" --link redis:aliasredis  -d  uploadtest
	-p port
	-name the 【container】's name
  --link link the container named redis, and give it the alias aliasredis
  -d run in the background
  uploadtest the 【image】's name
This achieves: inside container <font style="color:#24292E;">web</font>, accessing container redis via the alias aliasredis. Its principle is easy to understand: it works by adding name-to-IP resolution entries to /etc/hosts. If you open the /etc/hosts of container <font style="color:#24292E;">web</font>, you will see something like the following
172.17.0.2 redis
Finally, a note:
Docker officially no longer recommends using docker run –link to link 2 containers for communication; –link will be removed in later versions. But understanding its principle is still helpful for how to make 2 containers communicate with each other.
Option 2: docker-compose.yml
In the docker-compose.yml file, specify the link option to interconnect the containers — for example lines 16~17 in the code below
version: "2"
services:
  web:
    container_name: web
    image: php/5.6-fpm-alpine
    restart: always
    build:
      dockerfile: Dockerfile
    ports:
      - "80:80"
    environment:
      - FLAG=flag{Upload_Really_Good}

  redis:
    container_name: redis
    links:
     - web
    image: redis/redis:3-alpine
    restart: always
    ports:
    	- "6379:6379"
docker-compose.ymlcontainer interconnection example (abridged); full challenge at github.com/hi-unc1e/some_scripts/tree/master/puzzles/uploadTest
Running the test
Now let’s start docker
Command to start the image
$ docker run -p 8088:80 --name="web_ctf_puzzle_docler" -d web_ctf_puzzle
# Options you may use, and their meanings:
  # -d: run the container in the background and return the container ID;
  # -P: random port mapping
  # -h: specify the container's hostname
  # --name: specify the container's name
  # -p: specify a port mapping, format: host port:container port
  # -v: bind a volume (--volume), e.g. -v /opt/ctf/src:/var/www/html/ maps the host directory /opt/ctf/src to the container's /var/www/html/
Successfully building a docker image usually takes round after round of testing and modification; here are some tips for these operations
To control the docker (i.e. get into docker’s shell), replace 019dfb3e357b in the command below with the CONTAINER ID you get after running docker ps. I’m sure you know what I mean ;)
# Enter the docker's bash shell; if bash won't start, try sh
docker exec  -it  019dfb3e357b  bash
references
- How to Build Images with a Dockerfilehttps://segmentfault.com/a/1190000018210280
- CTF: Building a WEB Docker Range from Scratchhttps://zhuanlan.zhihu.com/p/60472331
- ByteCTF 2019 BabyBloghttps://github.com/glzjin/bytectf_2019_babyblog/
- Docker Microservices Tutorialhttps://ruanyifeng.com/blog/2018/02/docker-wordpress-tutorial.html
- YAML Introductory Tutorialhttps://www.runoob.com/w3cnote/yaml-intro.html